The DevOpsDays Boston 2020 Production Post

Author's note: This turned out to be a bit longer than I anticipated going in. Hopefully these headings are useful for you to find the information or story relevant to you. Don't feel bad not reading it all, skip around and take what's useful, leave the rest of my ramblings behind. They won't feel bad
For lack of a good way to organize this, I'm mostly going to tell the story chronologically and maybe that can help with why we made decisions and what we could have done differently. And anyway, it's at least a place to get started.
I think first it's it helps to understand how I fit into the organizing body for DevOpsDays Boston. I'm not in Boston and I didn't used to be in Boston (since DevOps has been a thing anyway) so it's fair to question how I got here in the first place. The short answer is that I moved away from the event I started personally (DevOpsDays Hartford) and wanted to help out with more events this year now that I wasn't so incredibly involved in that one. So starting in 2019 I offered my help to the two big regional events, DevOpsDays New York City and DevOpsDays Boston.
Going Virtual
Well. That was a hell of a week.
New York probably is it's own blog post worth writing being one of the last big tech events before COVID-19 shelter in place orders had us all stuck at home, but in this case, we're talking about Boston's event. Either way it's important to understand some of the timelines here. Deposits on physical venues were already promised as early as October 2019. Things had already happened by the time early March 2020 comes around and puts us all indoors. At this time, we've got to figure out a) Can we have a physical event this year? b) If not, do we want to do a virtual one?
In hindsight, obviously we were never going to have an in person event by September, but back in March and April we're still thinking, "Hey, maybe the summer all this will die down and we'll be back to normal by the Autumn?" and by May, this becomes obviously false. We eventually made the decision: In person is right out, let's try and make a virtual event happen.
I just checked the devopsdays.org website pull request history, we made it all official May 31st. Well. That was a hell of a week.
Reimagining DevOpsDays
For those that don't know, DevOpsDays Boston was preceded about one month by DevOpsDays Chicago and Matty Stratton (of Chicago) and I are good friends so there was some coordination between the two cities mostly amounting to, "How do we even begin thinking about this?"
One of the main takeaways for me was to think about the outcomes we were after rather than trying to recreate a physical conference. For instance, with an In Real Life conference, you wouldn't try to shuffle people between the main stage and breakout sessions back and forth every twenty minutes. It just takes too long to move 500-600 bodies around a venue. Plus there are bathroom lines, occupancy limits, a whole world of opportunity opens up to us with what and when we can do at the event. On the other hand, there's not exactly a "stage" to stand on or a projector push your slides to, so the whole very basic step of "how do we get ourselves in front of an audience" becomes a very real question in need of an answer. Of course, to qualify as a "DevOpsDays" all of us felt some form of community participation must happen, breakout sessions will be a thing.
Taking some inspiration from DevOpsDays Chicago and our own conversations, DevOpsDays Boston decided to shift the format from their standard a little bit. Instead of a stacking half-hour talks in multiple tracks and encouraging group conversations in running Open Spaces and lunch-table conversations, we opted to have shorter, 20-minute talks followed by a 15-minute, curated Question and Answer session. Then, for those that wanted to continue to dive into the topic (or if something of interest came up) we ran breakout sessions as the next talk began on our "main stage" broadcast. We knew we still needed/wanted to have sponsors so we knew we needed some way to give the sponsors the attention they're paying for. And all of this is in the context of drawing attention to massive inequality, racism, job loss (see also: health coverage loss), a pandemic, enormous wildfires, climate crisis, and an incredibly tense election season.
If DevOpsDays stands for one thing, it is for using our combined skills and experience to lift up our communities. It is always an extremely accessible event so we wanted to be sure it was priced to match. We had to be able to provide attendees a no-cost option to tune into the event.
Giving Back
The biggest costs of any in-person event are almost always some combination of the venue space itself and catering service. Add in things like wifi, signage, conference swag, and A/V services there are tens of thousands of dollars worth of savings just by moving an event online. Given that, and given the budget carry-over from the previous year's event, Organizers knew we could have the event even if we happened to make no money. The conference wasn't free to put on, which I'll talk about in a bit, but with the significantly reduced cost we decided the best thing to do this year, given the context, was to do two major things for the Boston DevOps community. The first was to offer the free attendee ticket price, but the second was to offer the revenue from those tickets back to the community.
There's a ton of money floating around the tech circuit and a ton of jobs that are remote friendly. For accessibility, we had a free-tier price for the event, but for those that wanted to give back we wanted to offer a name-your-price option. Given the limitations of the platform we chose, this turned into a $30 tier and a $200 tier. The latter intended mainly for folks that have a corporate budget for things like conferences and employee education. There were no differences in benefits between prices, this is purely to give more money to the three local non-profits.
To determine where to send the money we worked with the local Boston DevOps community to find organizations that promote equality in the tech work force. We ended up supporting Year Up, Resilient Coders, and Kode Connect.
Platform
If there's an equivalent of the venue in virtual conferences, it's the platform choice. That is, where does the conference exist in virtual space? Regardless of all the options out there, Boston chose to sign up and host our event on the Hopin platform. This was definitely the biggest expense for the event, but it also became the framework on which we hung the whole thing.
Hopin provides a number of benefits for event holders, there's text chat, breakout sessions, a sponsor expo area and networking. It handles the tickets and event registration and carries a basic schedule. It even provides a "studio" that allows the broadcast of peoples' cameras and screen sharing. With Hopin alone, an event Can Occur, but we did run into some challenges and ultimately had to abandon the "studio" option.
Ticket pricing was the first problem we ran into. We'd have really loved to do a "name your price" ticket option that had a default "recommended donation" price, but this wasn't available. We could have chosen to do tickets seperately, but we needed everyone who wanted to come to register with Hopin so... we opted for less toil and sacrificing the ticket pricing. Was this the best? I don't know, but it's the choice we made. Ultimately I think we could have raised more money using a different ticketing platform, but we would have had higher toil and may have missed out on the last minute registrations. Given the virtual nature of the event, we had our top two ticket revenue days on the day of and day before the event. We might have lost that.
Breakouts & The Hallway Track
The trademark of any successful DevOpsDays event is a vibrant and participatory community. Open Spaces have always been something of a requirement to even call your event a DevOpsDays. The idea here being that this is not a big-brains vendor conference, but truly a community conference where the goal is to share what's happening with DevOps in your local community from the actual people living around you. This type of interaction was therefore a requirement if we're going to take DevOpsDays virtual.
Logistically, recreating Open Spaces as they exist in Real Space, doesn't make a ton of sense. A lot of the Open Space format is about organizing an agenda and managing lot's of people within finite space and time. Without the face-to-face interactions or the space constraints, we decided that a requirement of "has community driven break-out sessions" was the real meat of the issue rather than "has Open Spaces".
Chicago had their approach shared in Matt Stratton's blog post, and Boston took this inspiration with a bit of a twist. Mentioned earlier were the talk-inspired breakouts, but along with these and rather than taking suggestions via chat, we had the community suggest topics they wanted to see discussed on the EasyRetro.io site and vote on their favorites.
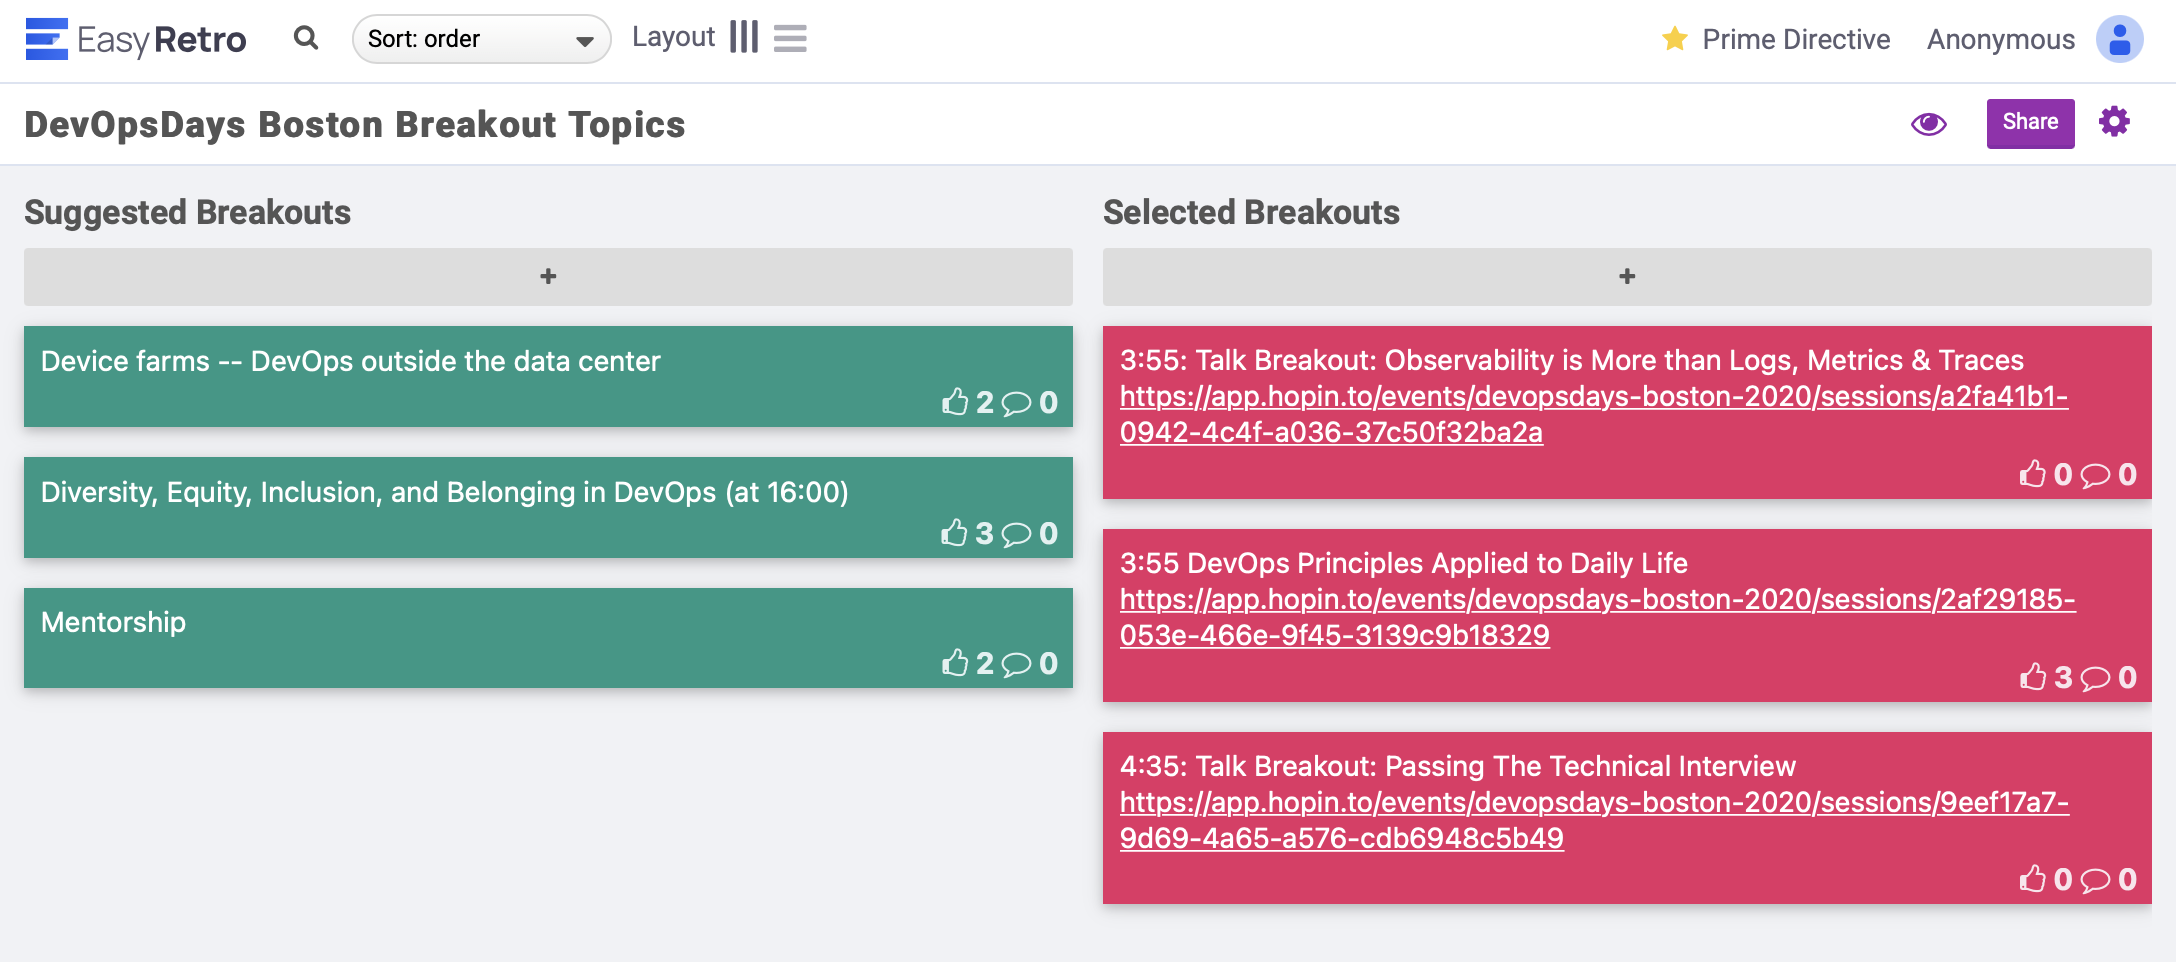
The most popular got turned into new breakout sessions after the Q&A sessions, and they ended when they ended. Some were short lived, and others lasted a couple of hours as discussions kept up. These breakouts all ran during the next talk session rather than on their own, allowing folks to jump to a new topic if they wanted, or continue to dive deep on what they found most interesting.
Broadcasting or Recreating the Stage
It bears repeating, virtual conferences are not real life conferences. They have none of the temporal standards nor spacial limitations of physical conferences. Getting "the show" right is more akin to running a live television broadcast than anything else, but the Hopin platform hasn't built anything to handle this.
Their "studio" is best compared to an open stage. Technically it's not much more than a video chat room that can be broadcast to a larger audience. Once it's set live, everything is shown to the audience including people joining and leaving, sharing screens, getting it just right, the whole thing just as if you were on a stage in front of an audience. It has the option to pause or stop the broadcast and resume, but the experience when nothing is playing isn't great either; you get just a small bit of text telling the audience either what should be happening now or what's coming up next depending on the times set in your schedule. Further, we committed to providing captions for maximum accessibility and wanted to show the graphic recordings from Minds Eye during the talks. The studio wasn't able to acommodate.
Hopin did, however, provide a custom link and stream code for an RTMP stream. This means that we could point some popular and open source broadcasting software at it and send whatever we wanted.
[Running a virtual conference] is more akin to running a live television broadcast than anything else...
Requirements
Having some experience, time, and curiosity on hand I dropped all other DevOpsDays responsibilities about a month before our event to focus on getting the broadcasting bits down. Ultimately I needed something that could fulfill the following criteria:
- Must be able to make "behind the scenes" changes and "go live" when ready. No one in the audience should see anyone fumbling to get slides up on the screen or videos resizing, etc.
- Must be able to pull in video and audio from multiple sources simultaneously.
- Has to have multiple "camera angles" available for an experience beyond the webinar style picture-in-picture talking-head and slides.
- Must be able to include closed or open captioning.
- Need to be able to record as well as broadcast to RTMP stream.
Ultimately I landed on the live-streaming favorite, Open Broadcaster Software or OBS for orchestrating, broadcasting and recording. For those unfamiliar, this is open source software that is designed specifically for live streaming and video broadcasts. Because of it's popularity and large community it is more than capable on its own, or through plugins, of handling the task at hand.
The "Studio"
Additionally we needed a way to get speaker video and slides and coordinate everything. A virtual "studio" where everything takes place while OBS acts as the camera control center choosing what to show and what to hide. This could have been something as simple as a shared Zoom window, but there are limitations and challenges here. Group chats aren't always high quality, sharing and unsharing a screen changes where elements are in the window, and people leaving and entering the chat could end up rearranging where the videos are and put the wrong person "on stage".
For this, I settled on using Skype as our platform for one major reason: Skype provides NDI outputs (more on this later) of every person's video in a separate stream including screen sharing. This means once I get a speaker's video all set once, the next time they join the chat it's there automatically, in the same place. Because each persons video stream is being separated out, I no longer have to worry about issues like Zoom windows rearranging themselves mid-talk and messing everything up.
NDI
So this is a key piece to how all of this fits together. NDI (from NDI.tv) is an IP (like Internet Protocol) standard for streaming video over the network. Devices listed as NDI Cameras broadcast their video out, and you can receive them on other devices (like your computer) with the proper tools installed.
For obvious purposes this can, say, let me use my iPhone as a webcam from across the house without even having to plug it into the computer. But for our purposes, the Skype software outputs each partcipant's video stream as its own NDI camera uniquely named for their skype account, the application, and the computer it's coming from. So rather than doing something like capturing the skype window and broadcasting that, I can capture each individual NDI stream as a separate "camera" and "microphone" connected directly into OBS.
There are some challenges here that need to be overcome or just accepted. First, Skype forces you to have their logo watermarked somewhere on the video. Fine, OK, whatever, this was a price I was willing to pay and just accept that it would happen. Second, it sends the same (entire) audio stream along each NDI stream rather than each individual's audio separately. This is easy enough to workthrough and I'll talk about it more in the Audio Mixing section. And finally, Skype changes the resolution of the NDI stream based on the connection quality of the person connected. This will resize the video in OBS unless accounted for. I'll talk about that a bit more as I talk about the OBS configurations below.
OBS Setup
There were a number of hours that went into getting all the setup and layout just so inclusive of testing and verifying in advance with speakers. Even now as I bring up the DevOpsDays Boston 2020 scene collection, there's a notable pause as OBS loads all of the assets I need. There's a handful of tips to make this bit easier so hopefully this can be a faster setup for someone in the future.
Scenes
Starting from the idea that I knew I wanted about 3 different scenes for the speakers, I began building out what the broadcast should look like, using my camera and keynote as stand-ins. This very quickly ballooned to 23 scenes that were used throughout the day's broadcast as I realized we needed scenes for the MCs to host the show, sponsor videos, rolling slides, "up next" and more. Here's the final tally and an explanation of how each was used:
- —Layout—
This ended up holding the consistent scene-to-scene elements, The background Image and Captions. Highly recommend this as you can add any "scene" as a "source" to any other scene. This prevents having to setup each slide over and over again and lets you "lock in" the basic background layout. - Opening
After lots of rehearsing between two MCs and a shared slide deck, it ended up making more sense to just pre-record the opening spiel and play it back as a video. OBS let's you add an auto-playing video to a scene so that was this. - MC + MC
We had two MCs. This scene originally existed to facilitate the opening and persisted for any other dual-MC bits that might be needed. - MC + Slides
For any additional slide thigns MCs might need to present. "Slides" in each case represents "whatever is shared on Skype". - MC, 1 Full
Close up of the single active MC. Used for those moments a single MC is speaking, usually in transition between speakers or to/from lunch, etc. - MC + Speaker
Side-by-side of the active MC and the current speaker for Intros and Q&A - Speaker + Slides
Classic small speaker, big slides layout. - Speaker - Slides Only
This is the Slides Only (with speaker voiceover) which was realy useful for any diagrams or hard to read slides to provide a little extra visibility. Not heavily used for all speakers, but a nice alternate view to have. - Speaker - Full
A close-up of the speaker themselves. This was used much more often especially for folks who tend to linger on a slide for a while. This lets the natural expressiveness of the speaker shine through so they're not confined to a tiny box next to a static slide image. - 2Speakers + MC
One of our sessions had two speakers just to make everything difficult so everything except Slides Only had to be recreated for 2 speakers to share the stage. - 2Speakers + Slides
See 10 - 2Speakers - Full
See 11 - [Name Redacted] - Full
So ultimately our "2 speaker" team took a lot of time with just one or the other person speaking. This meant that the 2Speakers - Full scene left us with one head talking and another just silently taking up space. I recreated full-screen scenes for each of these speakers on the fly during their talk to improve that experience. This sounds more impressive than it was, I mostly copied and pasted the Speaker Full scene and replaced the video asset with who I needed. - [Other Name Redacted] - Full
See 13 - Slide Roll
OBS lets you create an "Image Slide Show" source. You point it at a folder, it cycles through the images one by one according to the properties you set. This was our general placeholder for the "pre-show" and lunch time blocks. Along with the static slide images, I also imported audio from Spotify so I could play some placeholder music for folks rather than silent images. Warning: Laws around playing copyrighted music on live streams are A Thing To Look Out For. You're best off with royalty-free or twitch/stream approved music. I am not a lawyer and can offer no more advice about this. - BRB
This is a single static slide on our background, with our logo that simply states, "We'll continue shortly" again with Spotify piped in. This is the generic "oh shit" button for broadcast. If something doesn't go the way you expect, or there's technical difficulties, this slide is always available to cut to and it will drop all auido except whatever music you want to play. I ended up using this only once for technical difficulties, but I wouldn't leave home without it. Also very useful to head off any potential CoC issues with a speaker by being able to drop them at anytime. - Up Next
After lots of complex fiddling to try and automate this, I ended up just capturing a slide-deck output and setting all of our "up next" speakers in a big slide deck, swapping through it manually between talks when I had about 30 minutes of minimal other responsibilities other than to change scenes now and then. What would have taken a day to automate took maybe 20 minutes of real labor. Clearly not the right candidate for auotmation. - Sponsor 1
We had 4 sponsors who paid up to the "you get a commercial!" tier. Like the opening video these were pre-recorded and queued up ahead of time. Each scene auto-played the appropriate video for the appropriate sponsor. - Sponsor 2
See 18 - Sponsor 3
See 18 - Sponsor 4
See 18 - Transition
This ended up getting added last minute as we had some "community highlights" to fill in the transition times where we had no sponsors. Because this was running off a different slide deck (The same one I was using for Up Next, actually) rather than "whatever's shared on Skype" I had to create a new scene for this one. - Everybody now!
For the final farewell, a scene to fit every organizer on a single screen. Like your favorite zoom call, except manually organized and no body moves around when they turn video on and off.
Additional Video Stream: Graphic Recording
As an additional note about scene setup, we had the ever wonderful Ashton Rodenhiser of Mind's Eye Creative performing live graphic recording of each talk. The only way I was really able to fit this in was on the Speaker + Slides views. Thankfully Ashton knew how to share her graphic recording output as a camera that could be fed into Skype in place of her own video since we cannot share 2 screens and she needed a real-time view of the show rather than the delayed broadcast view to keep up with speakers. Once she had her video replaced with the graphic recording, it was just a matter of importing that NDI stream from Skype into OBS and placing it along side the other videos. This turned out to be one of the highlights of our event, people loved it.
Speaker Video Setup
You'll also notice above that I don't have a separate scene for each speaker. Instead, all the speakers' videos were layered on top of one another (with the latest speaker in the front-most position and the earliest at the back) and each video stream was hidden or unhidden as needed. More on how this was automated a bit later in the sections on Automation and Running the Show.
As mentioned in the Studio section above, Skype does this annoying thing where it will resize the video outputs. In order to get around this, it's important to make some very specific changes to the transform of each speaker's video.
- Right click on the source for a speaker and selcect Transform > Edit Transform...
- As you play with OBS you may become familiar with more of these settings like Position, Size and Cropping, but for our purposes we're going to adjust the Bounding Box Type to Scale to Inner Bounds
- You can now close this window
This ensures that even if the source changes resolutions, the video will be scaled (up or down) to ensure it fits within the bounding box you set. Now no matter where you place the video or how you resize it, it won't move around on you just because someone's wifi dropped a few packets.
Pro Tip: Request or ensure your speakers can plug into a wired ethernet connection as they present to ensure the highest quality video AND slide share. Skype prioritizes the screen sharing quality and will drop the speaker video quality as bandwidth is used up. Wifi connections almost universally cannot keep up with this demand because of how radio works. Full Duplexed wired connections are best.
Speaker Names: The Lower Third
Additionally, we wanted to make sure that each speaker got a "lower third" or "chyron" text across their video that would let us know who they were and their Twitter handle if provided. This isn't awful to set up, but it's also not incredibly intuitive, here's how I accomplished it:
- Add a Group source to whatever scene you want to work with and name it something like "SpeakerLowerThird"
- Find a nice background image that'll offset the text. This makes sure that whatever text color it won't conflict with the speaker's video and be hard to read. We'll dump the whole thing over the speaker video. There are a ton of examples of how this could look from banner-style images to just a simple flat color bar.
- Add that image to scene with a speaker and make sure it is a part of the "SpeakerLowerThird" group.
- Get the positioning, aspect ratio and scale setup how you'd like over the top of the video.
- Create a text file someplace easy to find (I placed it along side all my other DevOpsDays Boston assets on my computer). This will be the source for the text over the background image.
- Enter some placeholder text for now or use your first speaker as an example. It will interpret line breaks appropriately, so feel free to make use of this.
- Add a Text source to the OBS scene and have it Read From A File and designate the newly created text file as the source. Ensure this Text source is above the background image (or it will be covered by it) in the same "SpeakerLowerThird" group.
- Choose your font and resize the text so it looks nice on top of your background image.
- At this point I highly recommend Locking these elements in place because they're very easy to accidentally click on and drag all over the place and OBS has no undo button.
- For each additional scene, Add the existing "SpeakerLowerThird" group to it and reposition them as a single unit and lock in place once satisfied.
- To change the text on the screen, simply replace the text in the text file and (if in studio mode) transition the scene.
Pro Tip: On windows machines there is a good way to automate the text file changing. You might even find a great way to do it in an Automator script or something on Mac, but I did it manually because, again, about 10 minutes of real labor vs. all day scripting. To do this I made a second text file that simply listed all of the speakers in order and their Twitter handles double checked for spelling. I had both files open all day next to eachother and as one speaker finished up, I just copied from the big list file to the live reference file. I did this at the same time I swapped my "Up next" slides as it was a good reminder.
Audio
OBS has a great audio mixer that is useful for A Number Of Things. Unfortunately it's not always easy or intuitive on how to import the audio coming out of another application into OBS for broadcast. To get around this issue, I used an additional application from Rogue Amoeba called LoopBack.
Almost all of my audio sources were imported into 2 virtual LoopBack microphones. One was pulling in all of the output from skype (everyone else other than me). This provided two benefits. First, I can ignore all the duplicate audio sources from speaker video and just use the single Skype source for everything. But second, Because my microphone is excluded, it allows me to talk to everyone in skype without broadcasting my own voice. Do this. It lets you do a ton of coordination backstage as a little bug in the ear of whoever is live.
The second audio import was from Spotify. I kept this one separate just so that I had that "BRB" scene that dropped skype audio without having to click an additional button.
Finally, I had my mic dropped as an additional sound resource into OBS that could be manually unmuted. The only time I ended up using this was for the "All Organizers" scene and the Big Goodbye.
Captions
It's very important to DevOpsDays to be as inclusive as possible, so we committed to having live captions for our event. We recruited White Coat Captioning (a phenomenal live event captioning group with extensive tech event experience allowing them to get words like Kubernetes spelled correctly) for our event and they are able to provide a web link that displays the captions. Turns out this is perfect for OBS to import the website, live, in a frame and apply our own custom CSS to adjust appearance.
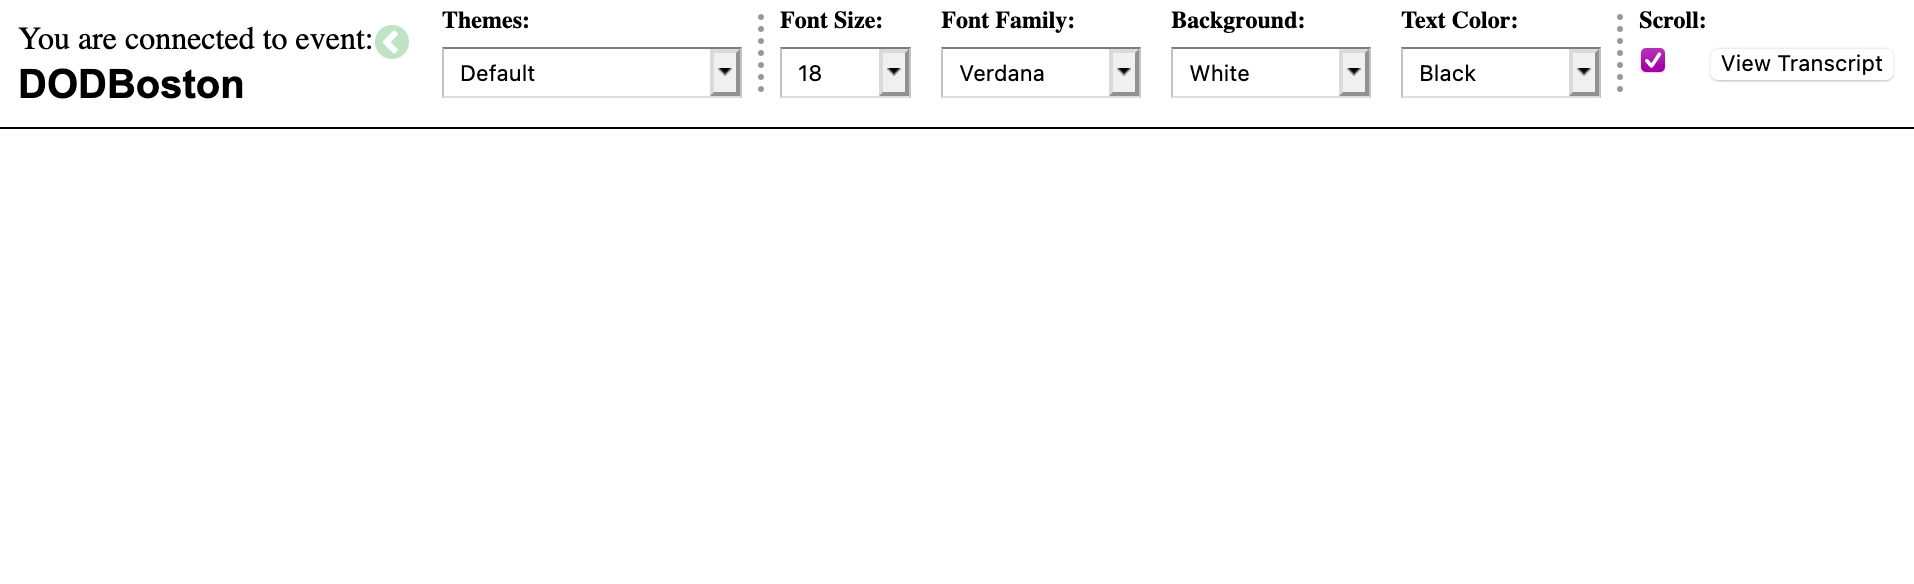
So first was taking the URL from the main site that would normally load up the output above. Then we loaded this style sheet over it:
#header, #messenger-wrap, #footer, .player-status { display: none; }
#content { background: #130F41; color: white; }
#player-wrap { display: block; width: 100%; }
#streamTextPlayer {
  padding-top: 0.25em !important;
  color: white;
  font-size: 40px !important;
  line-height: 1.5 !important;
  height: 100vh !important;
  width: 100vw !important;
  font-family: Arial !important;
  font-weight: bold;
}
Which gave us the nice dark blue bar with white text you see in our videos on YouTube.
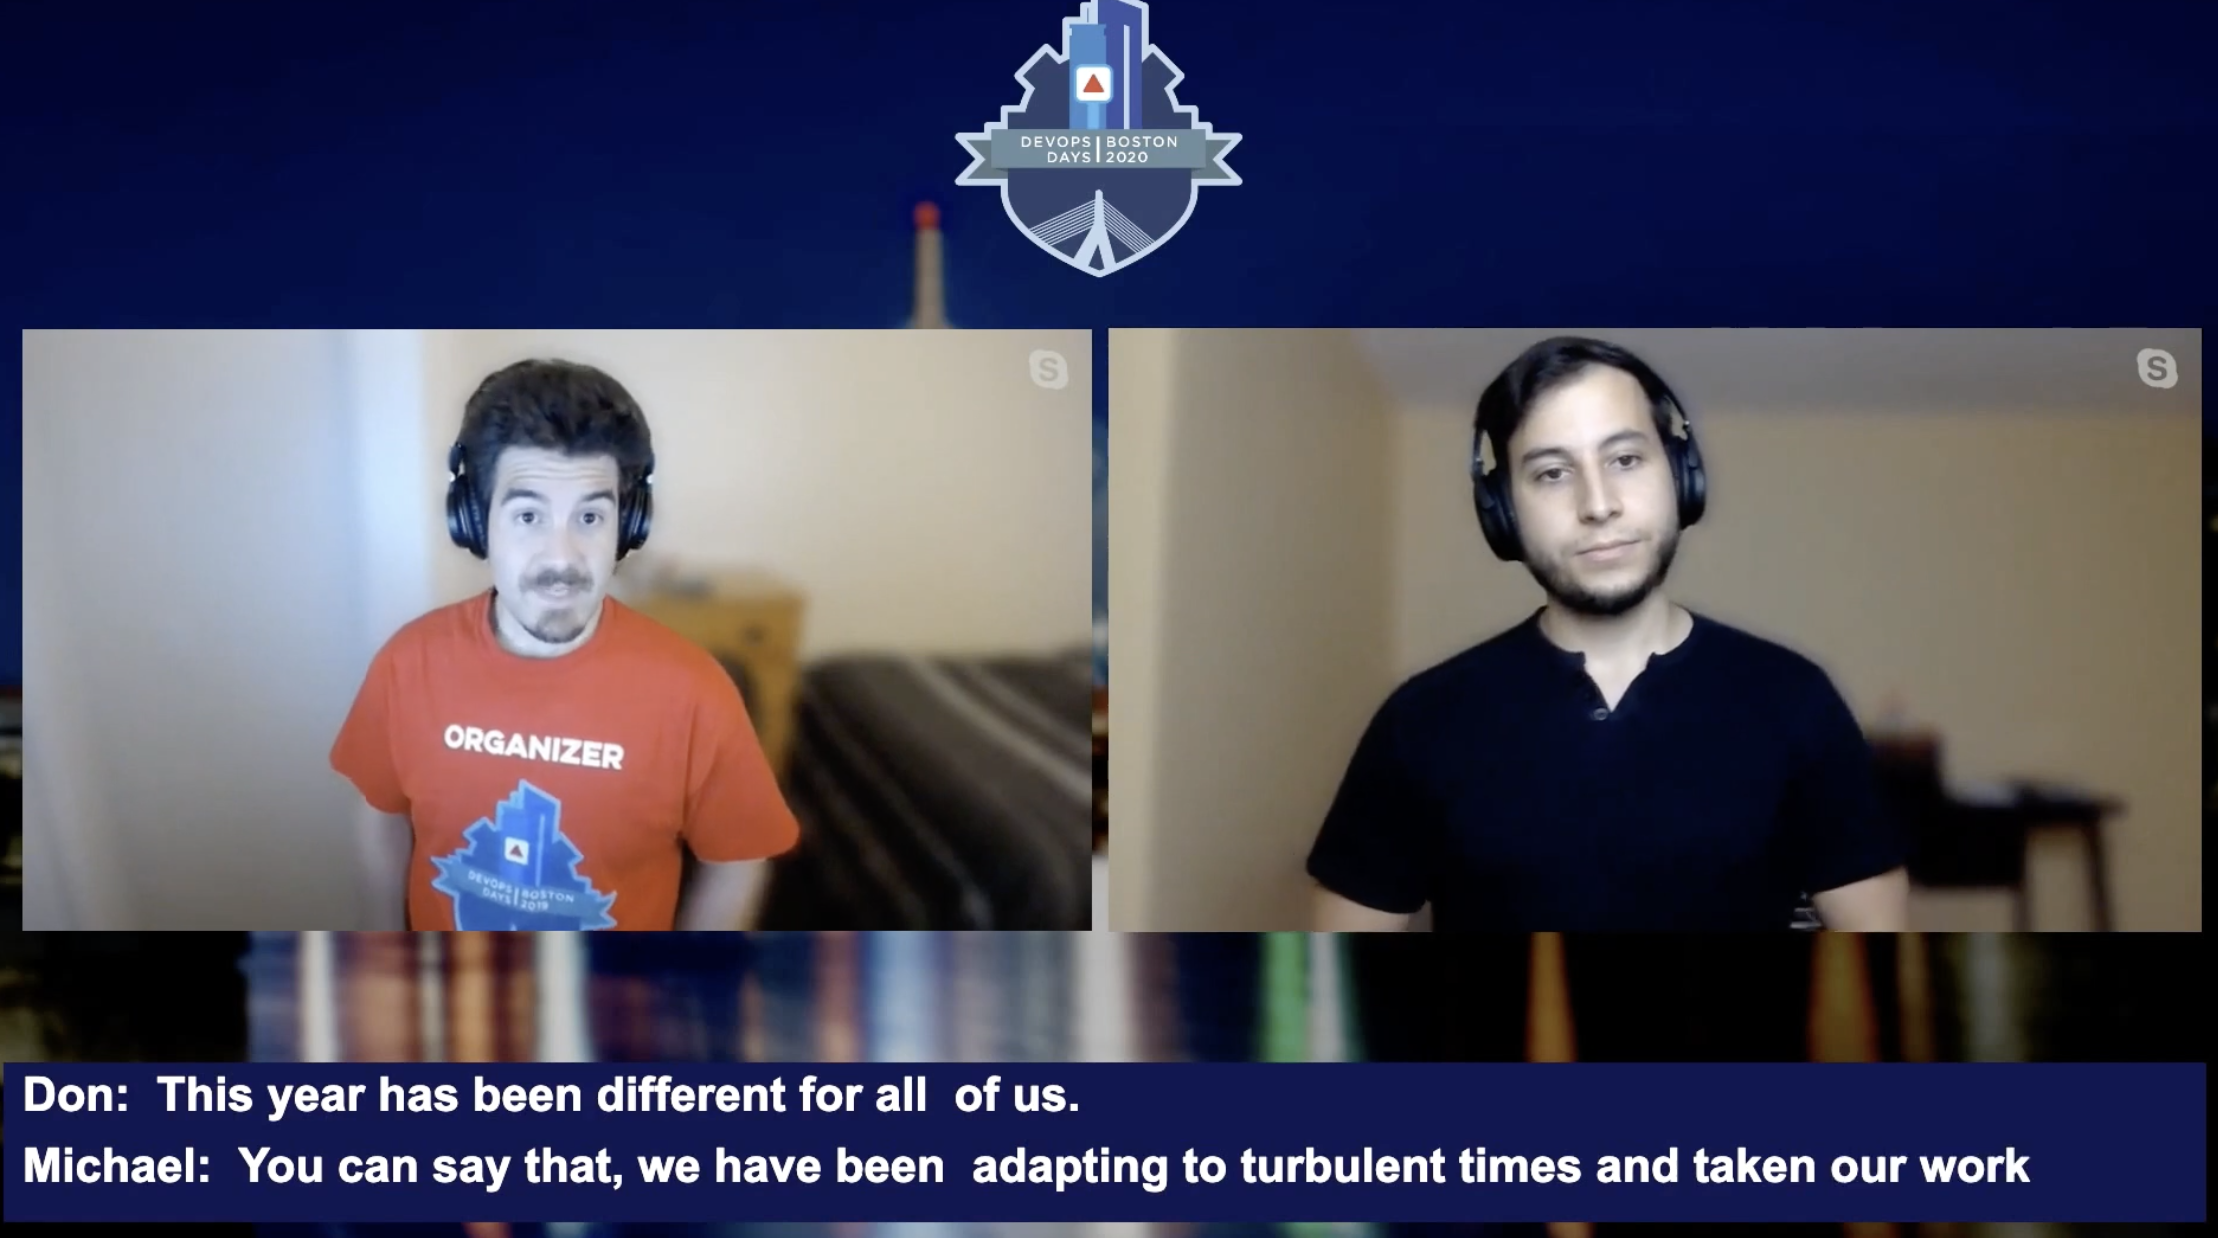
This was perfect for our needs. If our platform provided it, we could have worked on including the optional, closed captions, but these open captions burned into the video worked for us just fine.
Running the Show
This is where having some live-show experience can come in really handy, that type of "the show must go on" attitude applies here. Coordination and communication are vitally important to ensure everyone knows what to do and where to be as unlike an in-person event, there aren't the obvious queues of "you are in front of people on the stage and you can see your slides." If you're the person incharge of the broadcast, you have a huge responsibility to let everyone know roughly what's going on and making sure it all looks good. You'll want to give yourself as much of an advantage here as you can.
Automation
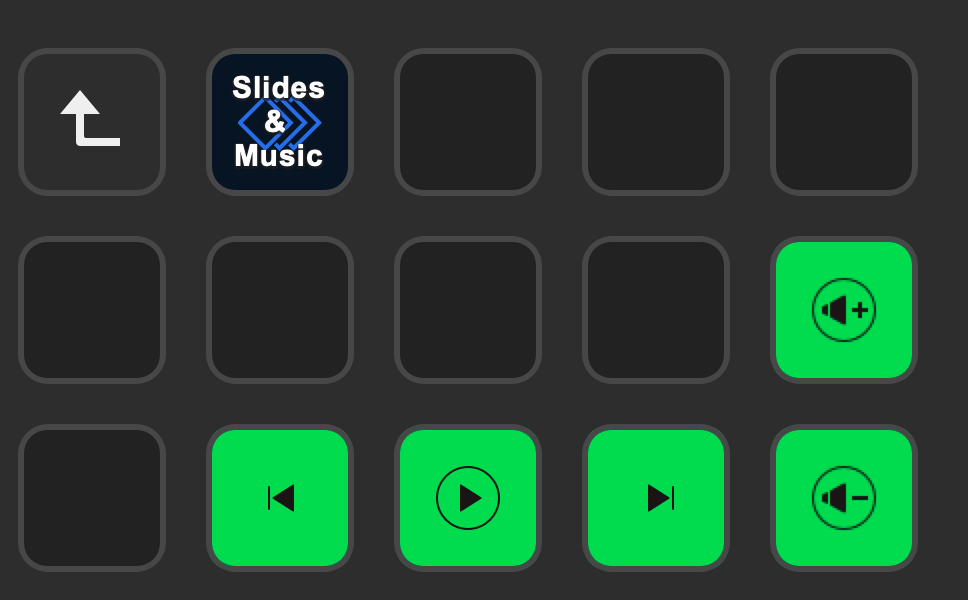
Part of that advantage is to automate and organize your transitions and slides. The more I thought about running the show directly and entirely out of OBS the more I realized why the Elgato Stream Deck exists. For anyone not familiar, Stream Deck is basically a fully customizable macro pad. It can work with a number of applications on your computer and has excellent support for OBS. Additionally, you can create a near infinite number of buttons by creating folders. You can even nest the folders, but that would have been a bit much here. To get an idea of how I used this to run the show, I'm going to show some screenshots of the configuration and explain what's happening with each.
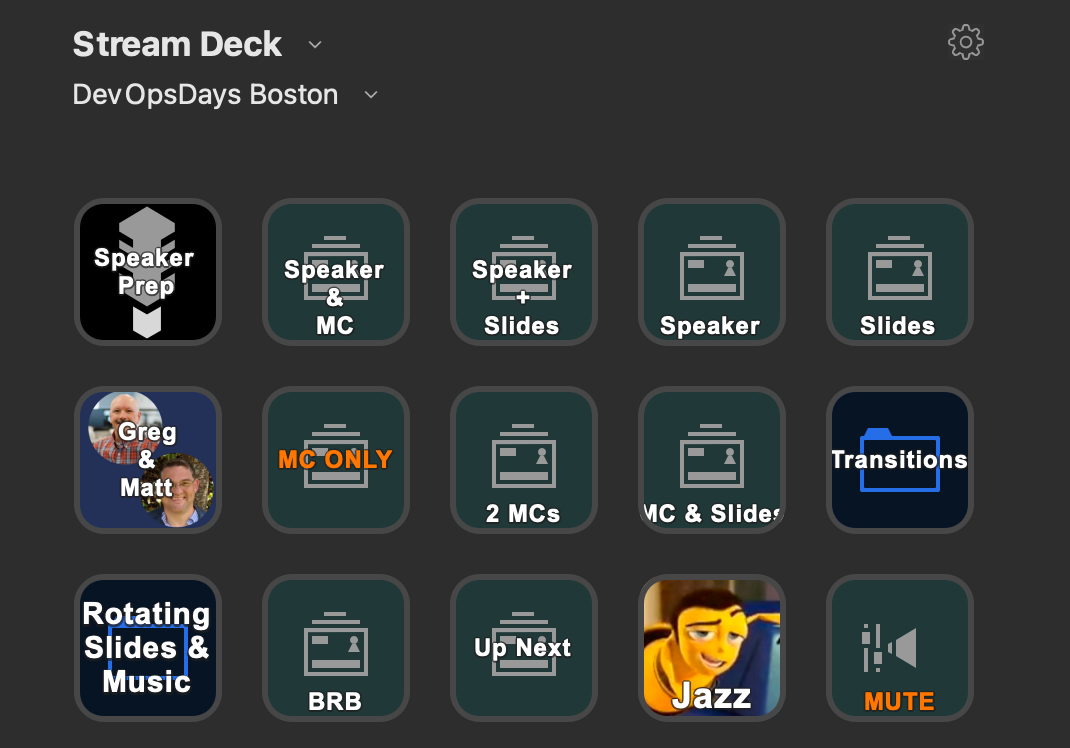
This is the main "page" I worked from. Most of these buttons (Green ones that show a little box with a Devo hat) are named for different OBS scenes and allow me to swap between them just by pressing the button. This turns looking for the correct scene, selecting it, and then transitioning to it in OBS into a one-button operation. The only other two buttons on this page are the "Jazz" button, which would play or pause the Spotify Jazz playlist I had queued up, and "Mute" which does what it says on the tin, mutes the main audio input. Every other button is a folder.
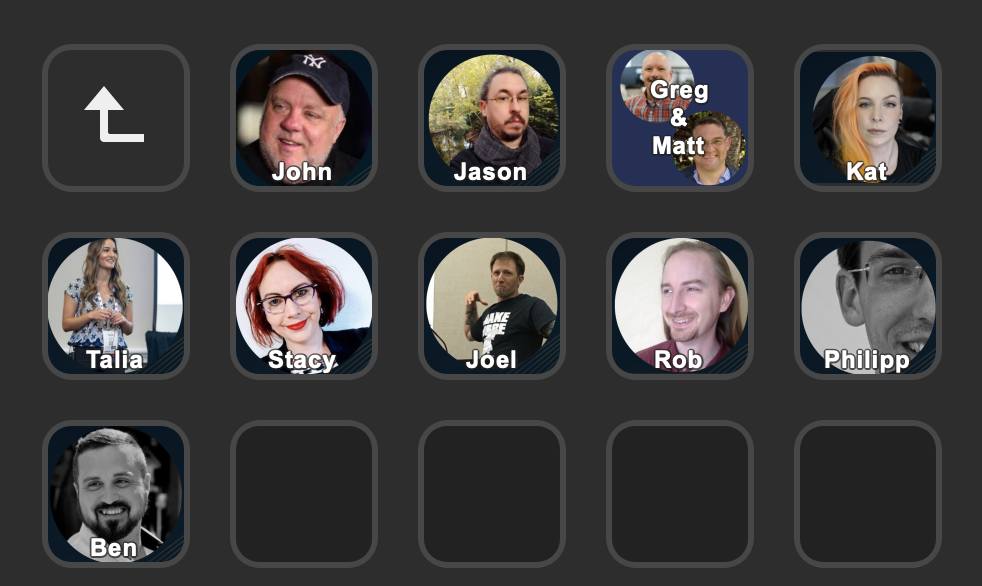
Above is the contents of the Speaker Prep folder. Tapping the arrow returns me back up a layer. I ended up grabbing everyone's headshots to customize the buttons just for fun, but the most important thing is that each speaker is lined up in order of appearance. It doesn't take a ton of thought or a complex system to remember which button to press next. Each of these speaker buttons, is actually a multi-action macro that does... a number of things in OBS. They take about 10-15 seconds to execute because of it. Here's a partial example
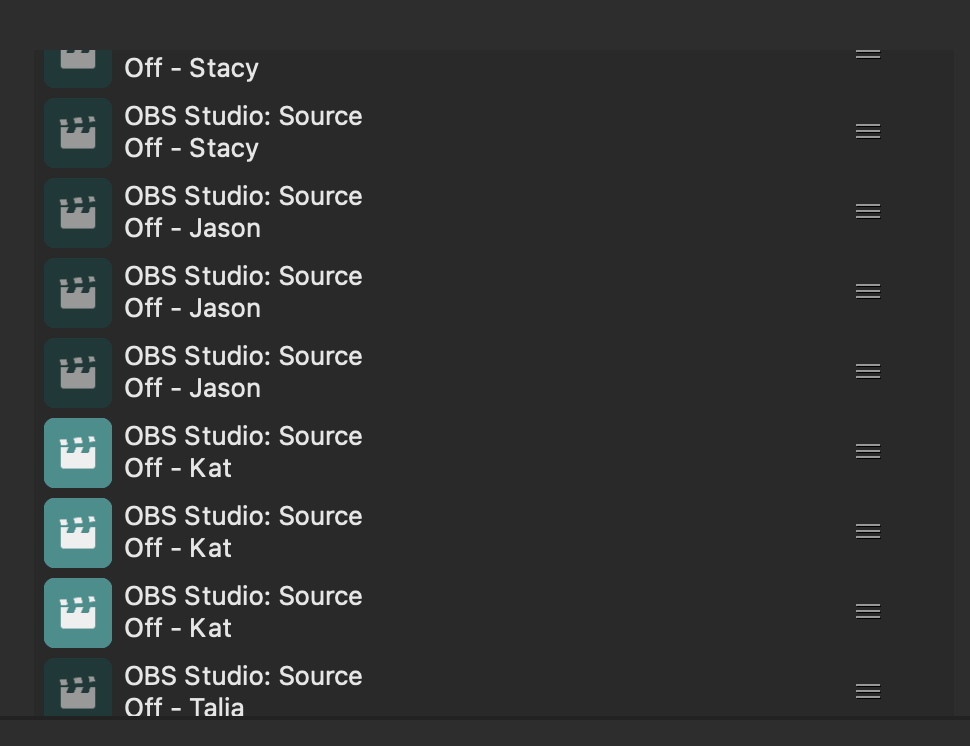
Through heavy abuse of copy-paste all of these names eventually became meaningless, except for the name of the speaker. That little clapboard icon indicates the manipulation of a Source in OBS. So, pressing a speaker button would cycle through the entire list of speakers ensuring whoever was NOT speaking had their source set to disabled and the speaker who IS speaking is set to enabled. This did the same thing for the MCs, swapping who was speaking.
If I had a Windows machine, I would have also included some system tools to update the lower-third text file here, but I could not get these tools to work on macOS. However, because of the execution time on these button presses, the workflow was very easy to keep up with and pressing the button made for a great reminder. During the "transition" or "sponsor" interstitials, I could easily, tap the next speaker, copy and paste the lower-third info, resave the text file, and cycle the "up next" slide.

Since our dual-speaker talk also had it's own scenes created in OBS, I had to have separate buttons for those, not just a setup file. The only setup is the Don MC button which swaps which MC is active. You'll notice the individual Matt and Greg buttons also and if you remember, I had mentioned I added these live during their talk. The same is true for the buttons as Stream Deck's configuration software is very easy to use and adjust button functions.
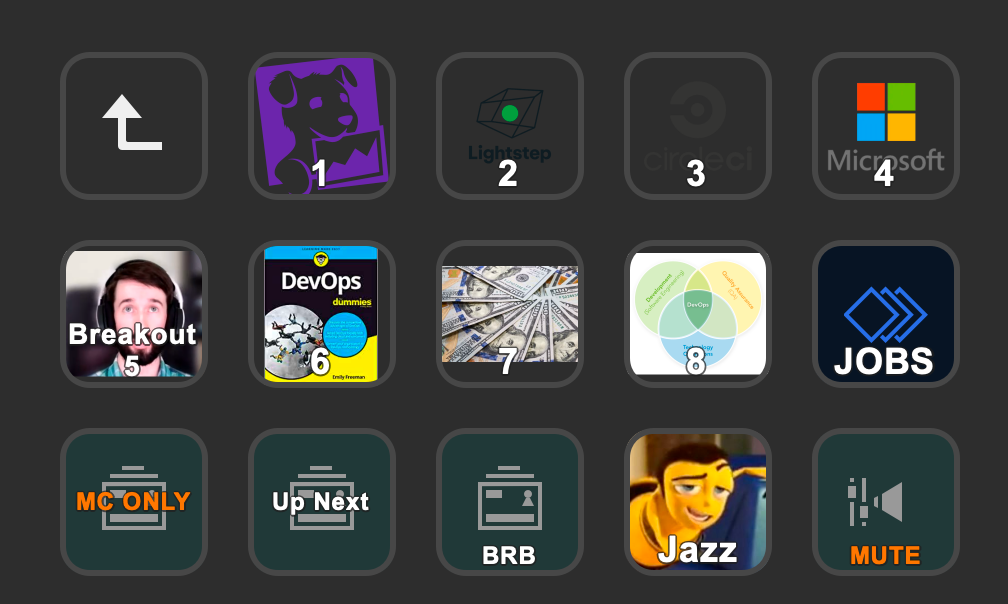
This is a view inside the Transitions folder from the main page. Each one is numbered for what order they go in and I set a picture that would remind me what each is about (like which sponsor pitch was being given, etc.). The Sponsor buttons merely change to the sponsor scene which auto-plays the video while the additional interstitial buttons had to swap out which community speakers were visible similar to the main speaker views. Additionally you'll see some familiar buttons along the bottom that I tended to need access to quickly from the transitions such as swapping over to the MC, displaying the Up Next and BRB scenes, playing some Jazz and muting skype audio.
The only other folder was very sparse. It contains a macro that swaps to the slide-roll scene (which auto-cycles through the slide images) and starts playing whatever is queued in Spotify. It also contains some basic Spotify controls if the music needs to be adjusted for whatever reason. I didn't really end up using these.
Ops
And this is where it all comes together. A lot of the skill of running a show is in accepting that whatever happens is going to happen and you can just do your best to make it good. There's a lot of wiggle room to feel things out and remember, most of the time the audience has no idea what's supposed to happen, so you can usually play it all off like you meant it. And even further, they have short memories, and want you to succeed anyway. Getting the confidence down is about half the work and to ensure I was confident in all my button presses doing what I wanted them to do and my timing of transitions, I spent probably about 30 minutes to an hour practicing and making sure I inherently understood the behavior of my tools.
Further, I was able to focus entirely on running the broadcast. I had a couple of communications channels open to ensure our "stage manager" could reach me, and I could reach him if I was missing anyone in Skype, but I never had to. Everyone showed up on time.
Because I split the videos out into their own NDI streams, it made it very easy. As long as they were quiet during broadcast, anyone could join or leave the chat without disrupting anything. Speakers and MCs generally joined during the "up next" slides displaying to the audience with some background music. Using OBS's studio mode, I could bring up a preview of each of the scenes I was going to use and ensure the speaker and MC video came through and slides were showing without changing what the audience saw. This let me check that none of my video transforms got messed up and all my lower-third titles were updated correctly.
Once satisfied with what it looked like (and the appropriate time window came up if we were ahead of schedule) I used my ability to talk into skype without broadcasting my audio to queue everyone. First I'd let them know, "Audio is going live right...now," unmuting the audio on "now" and then I would give a classic TV countdown to them showing up on screen, "And you are on in 3...2...1...now" again, pressing the "MC Only" scene right on "now". This let the MC talk for a bit, and as soon as they got partway through their intro, I'd swap to their shared screen with the Speaker, and finally as the speaker took over I'd cut to them and their slides as they began their talk.
From there it was just a matter of swapping scenes for what made the most sense to me in context, Speaker only, speaker and slides, or slides only. For a bit of added confidence (though I'm not sure if they really used it) I also rebroadcast my OBS output (what was being streamed) back into skype as my video stream. Speakers can't rely on the live view to check themselves because it was a good 15-30 seconds delayed, doubling my output into skype gave a live monitor.
That's it
There's not much more to add here. A ton of the work was in the setup and lots of googling. OBS is an incredibly powerful bit of software and can pretty much make things look how you imagine them if you learn how to work with it and there's a huge community out there of folks willing to help. There's a ton to cover and I'm sure you may have more questions, so feel free to find me on twitter @crayzeigh and I'm happy to chat with folks as I'm available.
And if you want to see the show, or be a part of it, keep an eye on devopsdays.org for info on Boston's 2021 conference (including our open Call For Papers) this September.